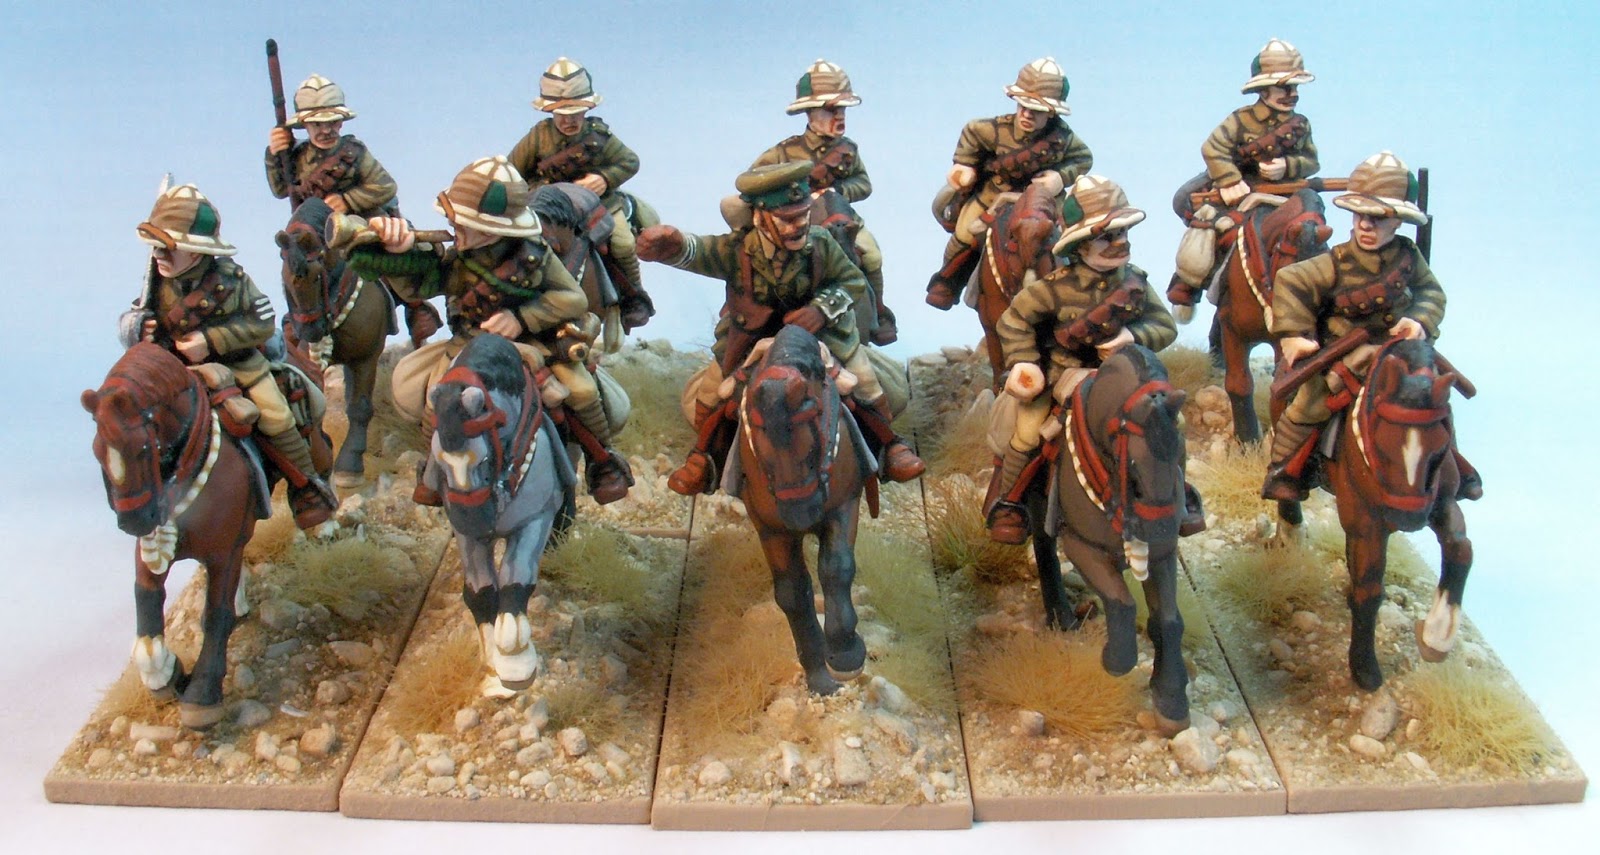
Finally, after three and a half years lurking about the "to complete" section of the painting shelf, I give you the mounted figures for the QODY project. There are some Footsore "BUF/Yeomanry" troopers in these, some British Lancer figures and the Hotchkiss gunner is a conversion from a Great War Miniatures British Cavalry trooper.
Yesterday, at Colours 2017, Newbury, we played the game. Almost a year in the planning, the huge sixteen feet long table attracted a lot of interest and kind comment. Adrian acted as Umpire, Steve, Simon and Andrew controlled the Ottoman forces while Rodger, Mike and myself pushed about the Tommies on the table top.
From the top of Ali el-Muntar looking down towards the British jump off point and the heavy gun lines.
Gaza, with low lying ground criss-crossed with cactus hedges and the slope of the ground rising to the top of Ali-el Muntar showing the last lines of trenches in the Turkish defence.
Tracking down the table towards the British jump-off point. the third of three redoubts on the forward slopes of Ali el-Muntar.
Continuing tracking down the table: the second redoubt....
... and the first redoubt.
A long spur of rising ground, then the British heavy gun lines in the distance.
The British end of the table. The initial infantry jump-off point was in front of the guns on the other side of the wadi.
Turkish defence in depth. HMG and field artillery emplacements would make this a hard and potentially bloody affair.
Rodger's troops on the jump-off point.
Two turns later, Mike's force entered table left over the soft sand dunes. Instantly he attracted the attention of Johnny's heavy guns. Fortunately for Tommy, Johnny's Heavy Artillery dice rolled badly throughout the whole game.
As Rodger's boys continued the long slog up the table towards the slopes, Mike's troops reached the first obstacle.... WIRE!
Rodgers command closes on the spur. HLMS PINCHER on the left, HMLS TIGER on the right. Soon Johnny was in for a bit of a shock because on turn six....
.... HMLS OTAZEL and the lead elements of my command entered the table on the right through a small area of dead ground. Mike's boys in the distance are held up by the wire and for the rest of the game they boldy struggled forward through shot and (innacurate) shell. Rodger brought his troops onto the spur and the assult on the first Turkish redoubt began to take shape.
OTAZEL rumbled up the slope with the 1/5 Suffolks in her wake forcing Johnny to test against "tank terror"....
... which they passed. Back on the heavy gun line the gunners from the Royal Garrison Artillery knocked out both HMG emplacements and the two batteries of Austrian Mountain Howitzers that were covering these trenches and the spur from slightly higher ground behind.
OTAZEL planted itself on top of Johnny's trench and fired both left and right causing havoc... but still Johnny held...
... as PINCHER and TIGER took the lead in Rodger's advance along the spur.
Just as your back is turned to take some photos, Johnny lands lucky and OTAZEL bursts into flames. The 1/5 Suffolks and 1/4 Norfolks ready themselves to take the trench at the point of the bayonet.
As the Turkish players capered about celebrating the destruction of OTAZEL, the Norfolks spang forward into the trench....
....while TIGER and HLMS NUTTY, (following on behind OTAZEL) pushed forward as the 1/5 Suffolks and the 1/5 Argylls from Rodger's command formed the second wave...
... and in they get. Johnny stood to a man and they sold their lives dearly.
Revving up the engine, 2Lt Carr drove Nutty on to take the top of this first hill from which the 163 Trench Mortar battery had cleared away the enemy.
But then the Turkish dice rolled true. NUTTY took a hit that stopped it dead, and PINCHER and TIGER were hit and knocked out. The Norfolks made it to the crest of the hull but fire from the next redoubt hit them hard and they faultered. By this time it was time to pack up.
No one claimed victory. Johnny still had Gaza. Tommy had had some success. The tanks performed as they did at Gaza in 1917.... they got there and then were knocked out. From left to right: Rodger ("We'll have to kill 'em all to take that trench"), myself, Mike (looking uncomfortable as his boots were full of sand), Adrian (Umpire, Conceptual Designer and Terrain Builder), Simon "Mustapha" Chick (we had to say that carefully), Steve (shellshocked at the dreadful Turkish dice results) and Andy "Unwin Pasha."
The Wargaming press was there and all came round to take photos. Something about this game will appear in Wargames Illustrated in a future edition as Dan stole my SD cap and wouldn't give it back until I promised to write something for him.
The nice chaps from Wargames Illustrated produced this video tour around the table:
Oh... I almost forgot. I built a BE2c from a horrid 1/48 Roden kit. All the bits kept breaking as I cut them from the sprues. I was so frustrated that once it was built all I had enthusiasm for was a very basic paint job. It proved just as good in combat....
Round 1 of dogfight...
... end of Round 2.
Ho hum... at least the pilot and navigator survived.
I am out of my comfort zone with these rather splendid sculpts from Spectre Miniatures. I don't normally attempt "moderns" and have turned down a number of requests to paint modern camouflaged subjects but these first fifteen, and twenty more, were requested by Steve who has presented me with some excellent projects in the past. I would have been rude to refuse. I allerted him to my lack of confidence in these subjects. It seemed not to bother him. They have sat for almost a year waiting to be done because every time I geared myself up to start, Steve or someone else would present me with something new and that gave me the excuse to put off the inevitable. Now that all the painting for the Second Battle of Gaza (to be presented at "Colours 2017", Newbury, next weekend) is over, I had to bite the bullet.
Here are fifteen "Pro-Government" Militia for somewhere in the Middle East.
Sometime soon a couple of units, both mounted and dismounted, of Australian Light Horse will be on the panting table. But what to do? There are not many figures out there that cover the ALH in Egypt and Palestine. I am not a fan of the ALH figures from Brigade Games and the only other option seemed to be conversions but the number of individual conversions required is somewhat off-putting. Then I remembered these chaps from Blaze Away (now owned by Lancashire Games). They are a little slender when compared to figures from Brigade Games, Great War Miniatures and Mutton Chop but I like them. The sculptor (and I would like to know who did these figures) has a created figures that ARE Lighthorsemen. The headgear is spot on. They wear an Aussie tunic. The LMG team carry a MK1 Hotchkiss. There is something about them that appeals to me. So here are a few test pieces to see what they would look like painted up and based. What do you think?
P.S.
Since making the original posting a couple of days ago a few people have asked me about the size of these figures when compared to other manufacturers. Here is a brief comparison:
Dismounted: (from left to right) Mutton Chop, Great War Miniatures, Blaze Away, Footsore miniatures, Woodbine Designs.
Mounted: (from left to right) Mutton Chop, Footsore Miniatures, Blaze Away, Great War Miniatures